Display JSON with HTML, CSS, and Javascript
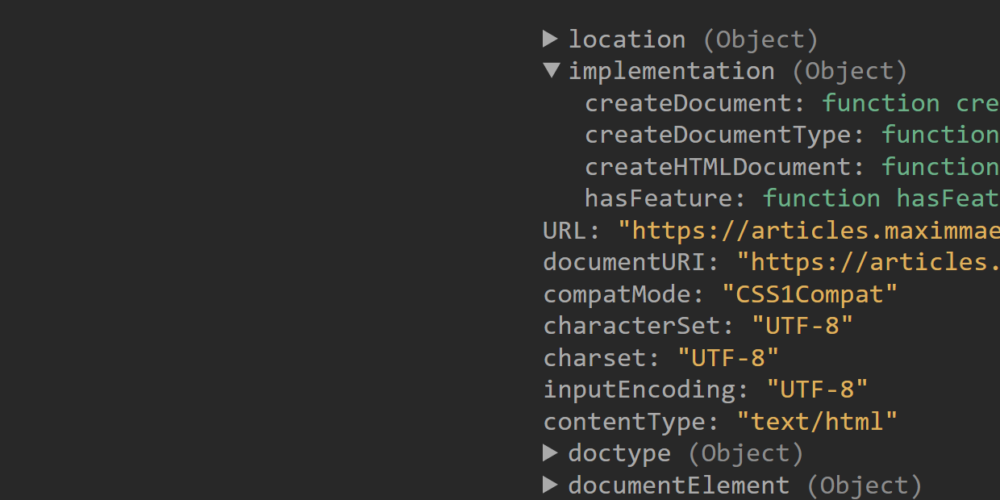
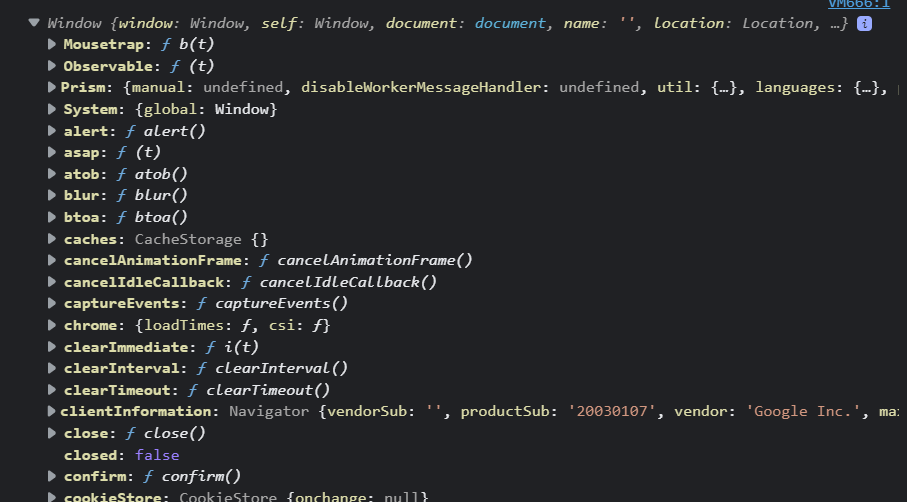
The most used tool by any Web Developer would be probably the Dev Tools that are built into the browser for os programmers to analyze the HTML and CSS of our pages. This Tool also shows us the outputs by console.log and if the output is more complex than a string or number. It will show a tree view of the object where keys are highlighted by their data type. Below you see the console of the browser Microsoft edge where the window object has been printed out. As you see we could further expand this view into the nested object it has, and today we will try to implement this in HTML with JavaScript and CSS. We will make a recursive function that will make the HTML of any given object. This could be useful for debugging purposes or for the sake of showing how to display any tree structure.
Let us get started!
¶JavaScript Code
Let us start with the JavaScript Code, which will just entail a function that will call itself for each branch of a tree or object.
¶Arguments
The function is set up to have three arguments. The first one is the root, which means the root element where the content is filled in. For each function call, this root will change so it is deeper into the tree. The data will be the object or array that should be displayed. And lastly, the depth just registers how deep the function call is into the object. This is needed for two reasons; Maybe we want to set a max width and maybe the behavior should be special for the first layer.
function renderJson({root = '', data, depth = 0} = {}) {
	...
}
Here we use object destructuring so we can have parameters for this function that can be given in any order. We also set a default Value of {}.
¶Setting up the Highest Root Element
Now inside the function, we first check if the depth is zero and if the root parameter is empty. This would mean that we are at the start of our object, so we have to create the root first. It simply consists of a ul element inside a pre, we then set the root to be the ul element.
	if (depth == 0 && root == '') {
        const pre = document.createElement('pre')
        const ul = document.createElement('ul')

        pre.appendChild(ul)
        root = ul
        document.body.appendChild(pre)
    }
    else {
        root.innerHTML = ''
    }
¶Looping over the Properties
Then we loop over the properties of the object that sits inside the data variables. In the loop, we check if the current value at the specified key is an object and not null. So inside here we have code that handles nested objects and arrays, but if that’s not the case this means its a primitive so we can just display it.
for (d in data) {
	if (typeof data[d] == 'object' && data[d] != null) { /* Handling Objects */ }
	else { /* Handling Primitive Values */ }
}
Let’s first go over the primitives inside the else statement, because we simply show the value. So we first get the type of data at the key. Then we create a li element, that will hold this value. The Display value will hold the actual displayed value. Then we check if the type is object with a switch case. Null is the only object that is displayed that is why we have to do it this way. If it’s not null we simply put in the value from the data.
let currentType = typeof data[d]
let el = document.createElement('li')
let display = null

switch (currentType) {
    case 'object':
        display = 'null'
        break;
    default:
        display = data[d]
        break;
}
¶Showing Primitives
Then we create three span elements. the first one holds the key and the second one holds the value. The third one holds additional info about the value like its length, boolean value, and its type. We add the content and a class to each one of these spans. Then we also append all these elements at the correct spots.
let titleSpan = document.createElement('span')
let contentSpan = document.createElement('span')
let detailsContentSpan = document.createElement('span')

titleSpan.innerText = `${d}: `
titleSpan.classList.add('titleStyle')

contentSpan.innerText = display
contentSpan.classList.add(currentType)

detailsContentSpan.innerText = `   Type: ${currentType}; Length: ${display?.length}; Boolean: ${Boolean(display)}`
detailsContentSpan.classList.add('moreDetails')

el.appendChild(titleSpan)
el.appendChild(contentSpan)
el.appendChild(detailsContentSpan)

root.appendChild(el)
¶Showing Objects
Now, what if the value is another Object or Array? In that case, we make a detailed element that can be expanded to show the content. The details tag also needs a summary tag that holds the title of the content, so we also make that.
const nestedData = data[d]

const detailsElement = document.createElement('details')
const summaryEl = document.createElement('summary')
summaryEl.classList.add('titleStyle')

detailsElement.appendChild(summaryEl)
Then we find out if the object is an Array. If that’s the case we show its length. This whole information will be shown behind the object in paranthases.
let appendedString = Array.isArray(data[d]) ? `Array, ${data[d].length}` : 'Object'

summaryEl.innerHTML = `${d} <span class="titleStyleDescription">(${appendedString})<span></summary>`
Then we create a new root element that is a ul. We append this to the details element.
const newRoot = document.createElement('ul')

detailsElement.appendChild(newRoot)

root.appendChild(detailsElement)
Now we haven’t actually inserted the nested content into the new lower root. For optimization purposes, we only insert the content if the user opens the details element. So we connect the click event of the summary element, and we check if the details element is open or closed. Now it is closed we clear it but if it is open we call this function itself with the new root and the nested data. This can go on as deep as possible.
summaryEl.addEventListener('click', () => {
    if ( !detailsElement.hasAttribute('open') ) {
        renderJson({
                root: newRoot,
                data: nestedData,
                depth: depth + 1
            })
        clicked = true
    }
    else {
        newRoot.innerHTML = ''
    }
})
And that’s it a recursive function allows us to show objects. We could simply call the function with any given object and it will be shown.
renderJson({data: document})
¶CSS Code
Now we can also style the displayed objects. We define some variables inside the root element and we change them if the user has dark mode enabled. We can do this with @media (prefers-color-scheme: dark).
:root {
    --bg: rgb(255, 255, 255);
    --titleStyle: rgb(121, 121, 121);
    --moreDetails: rgb(200, 200, 200);
    --string: orange;
    --number: rgb(0, 76, 255);
    --boolean: rgb(191, 0, 255);
    --function: rgb(109, 176, 137);
    --objectNull: rgb(176, 142, 109);
    --undefined: rgb(176, 142, 109);
}

@media (prefers-color-scheme: dark) {
    :root {
        --bg: rgb(40, 40, 40);
        --titleStyle: rgb(170, 170, 170);
        --moreDetails: rgb(140, 140, 140);
        --string: rgb(223, 177, 93);
        --number: rgb(119, 152, 229);
        --boolean: rgb(206, 142, 227);
        --function: rgb(109, 176, 137);
        --objectNull: rgb(176, 142, 109);
        --undefined: rgb(176, 142, 109);
    }
}
Now we also apply some styles to the body, any ul and pre‘s. We also hide the spans that show more details about the primitive by default so it only shows when the user hovers over its li elment.
body {
    margin: 0
}

ul {
    list-style-type: none;
    padding-inline-start: 20px;
}

pre {
    padding: 1em;
    margin: 0;
    background-color: var(--bg)
}

li:hover .moreDetails {
    display: unset
}

.moreDetails {
    display: none;
    color: var(--moreDetails)
}
We then just apply some styles to the different data types that can be encountered in such an object.
.titleStyle {
    color: var(--titleStyle)
}
.titleStyleDescription {
    color: var(--moreDetails)
}


.string {color: var(--string);}
.string::before,.string::after {content: '"';color: var(--string)}
.number {color: var(--number);}
.boolean {color: var(--boolean)}
.function {color: var(--function)}
.object {color: var(--objectNull)}
.undefined {color: var(--undefined)}
¶Showcase
¶Conclusion
Excellent! You have successfully displayed JSON using JavaScript code!
Keep in mind that I am also just a beginner, so it could be that my way of solving these problems is not the best or that I use functions or features that aren’t advised to use. Always ask questions and try to solve problems your way!


Leave a Reply