
Animations with JavaScript
In this relatively short Tutorial, we will make a JavaScript Function / Class that helps us to create Animations for our Website! We’ll use Typescript and JavaScript Classes with static properties.
We will not only Learn about Animations but also a little bit about Browser Rendering and Typescript.
I use Parcel, a straightforward and intuitive Build Tool for this project.
Let’s get into it!
¶Animate Function
To make our function(s) look fancy, we’ll encapsulate them in a class called Animations; below, you will see the rough outline of our class. Static means we don’t have to make an instance of this class; we can call Animations.animate() in our code. It simply consists of four static Methods.
class Animations {
    static linear() { /* ... */ }
    static quad() { /* ... */ }
    static circ() { /* ... */ }

    static animate() { /* ... */ }
}
These first three Methods are used for timing. In CSS Transisions, several functions determine how the Animation Progress is calculated, and these are essentially the same. For now, only go over the animate function; you can view the complete code on Github.
The Animate Function takes four Arguments: the animation duration, the progress callback, the timing function, and end/after callback.
The callback will receive the progress of the animation as a float, where 0 means no progress and 1 means finished. As you see with typescript, we can type a callback like this (arguments with their types) => return type. We do something similar for the after-callback but don’t need arguments there. Lastly, the timing function is, by default, linear.
static animate(
    duration: number,
    callback: (progress: number) => void,
    timingFunction = Animations.linear,
    after_callback?: () => void
) {
    /* Magic */
}
Within the function, we start by getting the current time with Date.now(), which returns the current time in Milliseconds since January 1, 1970, UTC. After that, we also find the time the animation should end by adding the start to the duration.
const start = Date.now()
const end = start + duration
Continuing, we create a function called cb that will be called multiple times during the animation. Skipping the function for now, we call the requestAnimationFrame function with cb as a callback. Later we will learn why we use this instead of something like setInterval.
function cb() {
    /* Magic */
}

requestAnimationFrame(cb)
Within this callback, we start by once again getting the current time, and with this information, we calculate the progress of the animation. We also put this value through the given timing function so more exciting progress values can be returned. Then we call the given callback with this value so other programmers can do their thing.
const timePassed = end - Date.now()
let timeFraction = 1 - (timePassed / duration)
timeFraction = timingFunction(timeFraction)
timeFraction = timeFraction || 1
timeFraction = Math.min(timeFraction, 1)

callback(timeFraction)

if (Date.now() < end) {
    requestAnimationFrame(cb)
} else {
    after_callback && after_callback()
}
Lastly, we check if the animation is still ongoing according to the current and end time. If that’s the case, we again call the requestAnimationFrame function; if not, we simply call the after-callback function if it’s defined.
¶Why do we use requestAnimationFrame?
I have talked a lot about the requestAnimationFrame function, but what does it do? We must learn how Browsers (re) render web pages for this.
This article goes into detail, but the gist is that when we make changes via JavaScript, the Browser goes through several steps to rerender the webpage. It has to go through more or fewer steps depending on what we did.
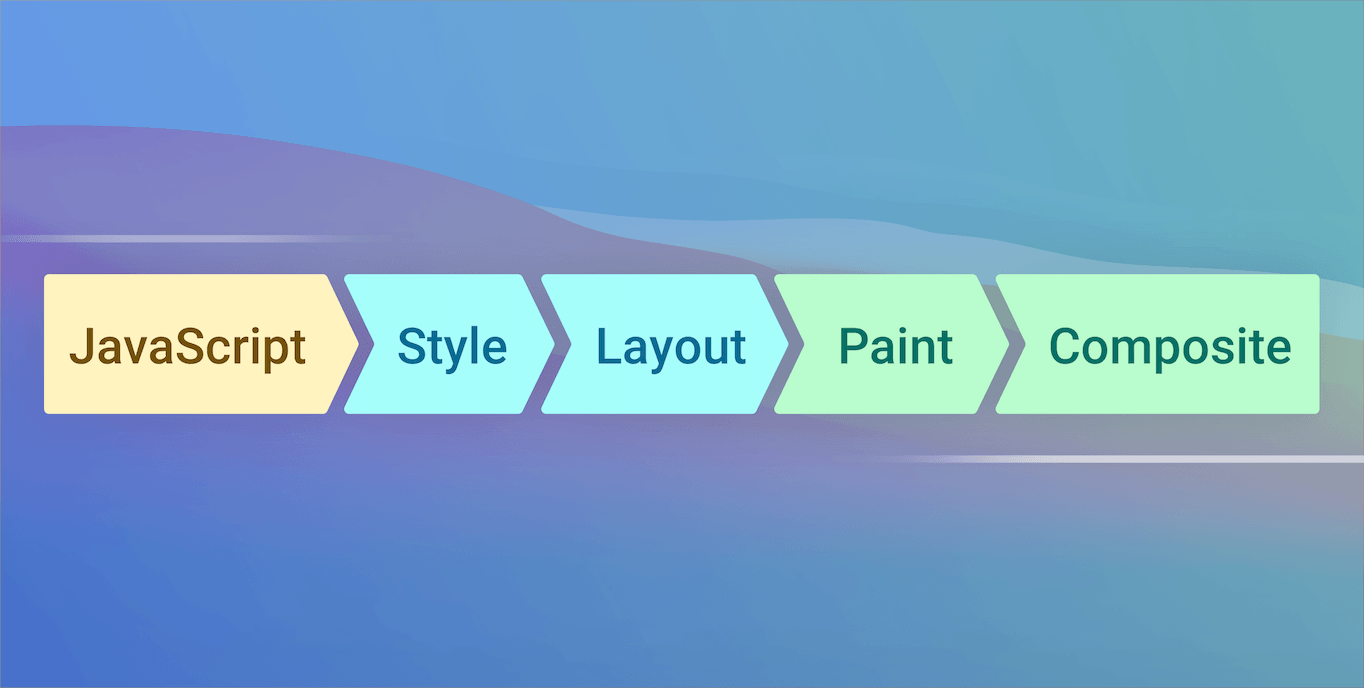
When we, for example, change the left CSS property on an element, a layout change must be recalculated, which can take a relatively long time. If we put the code that triggers this in a callback called requestAnimationFrame, its changes will be part of the next Frame either way, so we don’t start unnecessary recalculations.
¶Using the animate function
Lastly, let’s look at the example usage of our function.
¶Animate the scale of a Canvas Element during 5 Seconds
As you, we still have to do some lifting because the callback only provides the progress value. There is a great library that makes animations really easy called Animejs.
Animations.animate(
    5000,
    (pr) => canvas.style.scale = `${ .1 + 0.9 * pr }`,
)
¶Infinite Animation
As you see, we can also make an infinite animation with the after-callback we implemented.
function comeIn() {
    Animations.animate(
        5000,
        (pr) => canvas.style.scale = `${ .1 + 0.9 * pr }`,
        Animations.linear,
        goOut
    )
}

function goOut() {
    Animations.animate(
        5000,
        (pr) => canvas.style.scale = `${ .1 + 0.9 * (1 - pr) }`,
        Animations.linear,
        comeIn
    )
}

comeIn()
¶Conclusion
That’s it. We have created a function to animate values with JavaScript. I hope you had a good time reading and that you learned something new 😀.

Leave a Reply