
Product Tour with JavaScript and SCSS
In this article, we will try to make a Product Tour with JavaScript. A Product Tour or Feature Tour shows users what a Website or Software can do interactively. We will make a function that will handle rendering the panel and the focus element and switching through the different steps. This function will receive a list of destinations for the tour. To keep it simple, we won’t go into websites that have scrollbars, and it won’t be fully responsive. For this to work, we will need the CSS Clip-Path Property and JavaScripts getBoundingClientRect() function. Look at the demo to get a better idea of what I mean. Lastly, we will make use of SCSS to style our Product Tour Elements
¶JavaScript for the Product Tour
Let’s start with the JavaScript of the program. As mentioned before, we will make it so another programmer or we can call a function and pass in a list, and the tour should work. The list will hold objects with title, text, and element keys needed for the tour to work.
We call the function runTour, which has the tourList parameter. Inside the function, we start by defining three variables. currentIndex will hold the index of the current step, and panelMargin will be how far away from the focused element the panel will be. Lastly, the indicatorPadding is how much space is added to the clip focus.
function runTour(tourList) {
    let currentIndex = 0
    const panelMargin = 10
    const indicatorPadding = 5

	...
}
¶Creating the DOM
We then create the needed HTML for our Product Tour. We do this with document.createElement(), which will return the newly created element. We make one div that will wrap a panel element and an indicator. The panel will show text and the buttons to navigate to the next element, and the indicator will blacken out the whole screen except for the currently focused element. We add appropriate classes to these elements with element.classList.add(); we later need those to style the elements in SCSS. Creating elements this way may look like much, but it’s good in this case because we also need some references to these elements later in our program. so keep that in mind.
	// Create Elements
    const wrapperNode = document.createElement('div')
    wrapperNode.classList.add('tourElementWrapper')

    const indicatorNode = document.createElement('div')
    indicatorNode.classList.add('indicator')
    wrapperNode.appendChild(indicatorNode)

    const panelNode = document.createElement('div')
    panelNode.classList.add('panel')
    wrapperNode.appendChild(panelNode)

    const titleNode = document.createElement('h2')
    panelNode.appendChild(titleNode)

    const textNode = document.createElement('p')
    panelNode.appendChild(textNode)

    // Bottom Button Bar
    let buttonBar = document.createElement('div')
    buttonBar.classList.add('buttonBar')
    panelNode.appendChild(buttonBar)

    const previousButtonNode = document.createElement('button')
    previousButtonNode.innerHTML = 'Previous'
    buttonBar.appendChild(previousButtonNode)

    const counterNode = document.createElement('div')
    buttonBar.appendChild(counterNode)

    const nextButtonNode = document.createElement('button')
    nextButtonNode.innerHTML = 'Next'
    buttonBar.appendChild(nextButtonNode)

    document.body.appendChild(wrapperNode)
¶Connecting Events
After creating all the necessary elements, we need to connect some events. But before that, we need to call the placePanelAt() function, that will, as its name suggests, place the indicator and panel in the correct position. We then add pointerdown events listeners to the next and previous buttons, and we give them references to the nextSpot and previousSpot functions which we will define in a bit. Lastly, we also connect the keydown event on the window with an arrow function that will call the appropriate function in case the user has pressed ArrowLeft, ArrowRight, Enter, or Backspace. Lastly, we add an event listener for the resize event that will call placePanelAt, essentially updating the position in case the window was resized.
    // Place the Panel for the First time
    placePanelAt()

    // Connect Events with Actions
    nextButtonNode.addEventListener('pointerdown', nextSpot)
    previousButtonNode.addEventListener('pointerdown', previousSpot)

    window.addEventListener('keydown', (event) => {
        if (['ArrowLeft', 'Backspace'].includes(event.key)) previousSpot()
        if (['ArrowRight', 'Enter'].includes(event.key)) nextSpot()
    })

    window.addEventListener('resize', placePanelAt)
¶Next and Previous Function
The nextSpot function will advance the current destination in the tour, but it will also hide the panel and indicator in case the tour is finished. We also need to add one to currentIndex because placePanelAt will use that to get the current item.
    // Functions
    function nextSpot() {
        if (currentIndex + 1 == tourList.length) {
            panelNode.style.display = 'none';
            indicatorNode.style.display = 'none';
            return
        }
        currentIndex += 1;
        placePanelAt()
    }
previousSpot will do the reverse. It will go back one step, and it will ensure that the currentIndex is not -1.
    function previousSpot() {
        if (currentIndex - 1 == -1) return
        currentIndex -= 1;
        placePanelAt()
    }
¶Panel Placement Function
Let’s also go over the most important function: placePanelAt(), which will place the indicator and panel and switch the text inside the panel.
We start by getting the object from the list at the current index; we then also check whether an element string was given; if that’s not the case, we want to indicator to hide itself and the panel to go to the middle of the screen. After that, we want to get the x, y, width, and height of the current element, and we do that with getBoundingClientRect(), which returns more stuff we don’t need so we destructure the object. Now in case, no element was given, we fill in an object where all values are 0.
    function placePanelAt() {
        let currentData = tourList[currentIndex];

        const elementGiven = currentData.element != undefined

        let { x, y, width, height } = elementGiven ?
            document.querySelector(currentData.element).getBoundingClientRect()
            :
            {x: 0, y: 0, width: 0, height: 0}

        ...
    }
Continuing, we calculate the left, top, right, and bottom according to the information we got earlier and the indicator padding. We then set the clipPath property on the indicator so it will cover everything except for the current element. As you see, this involves a lot of coordinate setting, but it will get the job done.
		const left = x - indicatorPadding
        const top = y - indicatorPadding
        const right = x + width + indicatorPadding
        const bottom = y + height + indicatorPadding

        indicatorNode.style.clipPath = `polygon(
            0 0,
            100% 0,
            100% 100%,
            0 100%,
            0px ${bottom}px,
            ${right}px ${bottom}px,
            ${right}px ${top}px,
            ${left}px ${top}px,
            ${left}px ${bottom}px,
            0px ${bottom}px
        )`
Lastly, we set the content of the panel title and text, and we place it. To do this, we also check where the current element is so the panel is not placed outside the viewport, or in case no element was given, we place it in the middle of the viewport.
        // Change the text content of panel
        titleNode.innerHTML = currentData.title
        textNode.innerHTML = currentData.text

        counterNode.innerHTML = `${currentIndex + 1} / ${tourList.length}`

        // Place Info Panel

        let { width: panelWidth, height: panelHeight } = panelNode.getBoundingClientRect()

        if (elementGiven) {
            panelNode.style.top = window.innerHeight / 2 > y ?
            y + height + panelMargin + 'px'
            :
            y - panelMargin - panelHeight + 'px'

            panelNode.style.left = window.innerWidth / 2 > x ?
            x + width + panelMargin + 'px'
            :
            x - panelMargin - panelWidth + 'px'
        } else {
            panelNode.style.top = window.innerHeight / 2 - panelHeight / 2 + 'px'
            panelNode.style.left = window.innerWidth / 2 - panelWidth / 2 + 'px'
        }
That’s it for the JavaScript; let’s add some SCSS / CSS.
¶SASS / CSS
Below you see the whole SCSS for the program. It’s important that we set the panel and indicator to position: fixed so we can place them anywhere on the screen with left and top. We also give them a transition, so they move smoothly. We make the indicator fill out the whole viewport by using vw and vh, and we give it a transparent background.
.tourElementWrapper {
    .panel {
        position: fixed;
        top: 100px;
        left: 100px;
        background-color: hsla(0, 0%, 100%, 0.1);
        backdrop-filter: blur(5px);
        box-shadow: 0 1px 3px hsla(0, 0%, 0%, 0.3), 0 3px 2px hsla(0, 0%, 0%, 0.2);
        border-radius: 4px;
        padding: 1rem;
        width: 250px;
        font-family: 'Segoe Ui';

        color: white;

        transition-property: top left;
        transition-duration: 0.5s;
        transition-timing-function: ease;

        h2 {margin-top: 0; margin-bottom: 0.2rem;}

        p {margin-top: 0;}

        a {color: inherit;}

        .buttonBar {
            display: flex;
            justify-content: space-between;

            button {
                font: inherit;
                background-color: hsl(220, 10%, 79%);
                border: 1px solid hsl(220, 10%, 50%);
                border-radius: 4px;

                &:hover {
                    border-color: hsla(220, 10%, 50%, 0);
                    cursor: pointer;
                }
            }
        }
    }

    .indicator {
        position: fixed;
        top: 0;
        left: 0;
        width: 100vw;
        height: 100vh;
        background-color: rgba(0, 0, 0, 0.5);

        transition-property: clip-path;
        transition-duration: 0.5s;
        transition-timing-function: ease;
    }
}
¶Usage
Now how does this work? In our potential UI we need to import the CSS file and Script.
<link  rel="stylesheet"  href="tour.css">
<script  src="tour.js"></script>
and in our script we need to call the runTour function with a list looking like this.
runTour([
	{
	    title: 'First Title',
	    text: 'First Text',
	},
	{
	    title: 'Second Title',
	    text: 'Second Text',
	    element: '#secondElementQuery',
	},
	{
	    title: 'Third Title',
	    text: 'Third Text',
	    element: '#thirdElementQuery',
	},
])
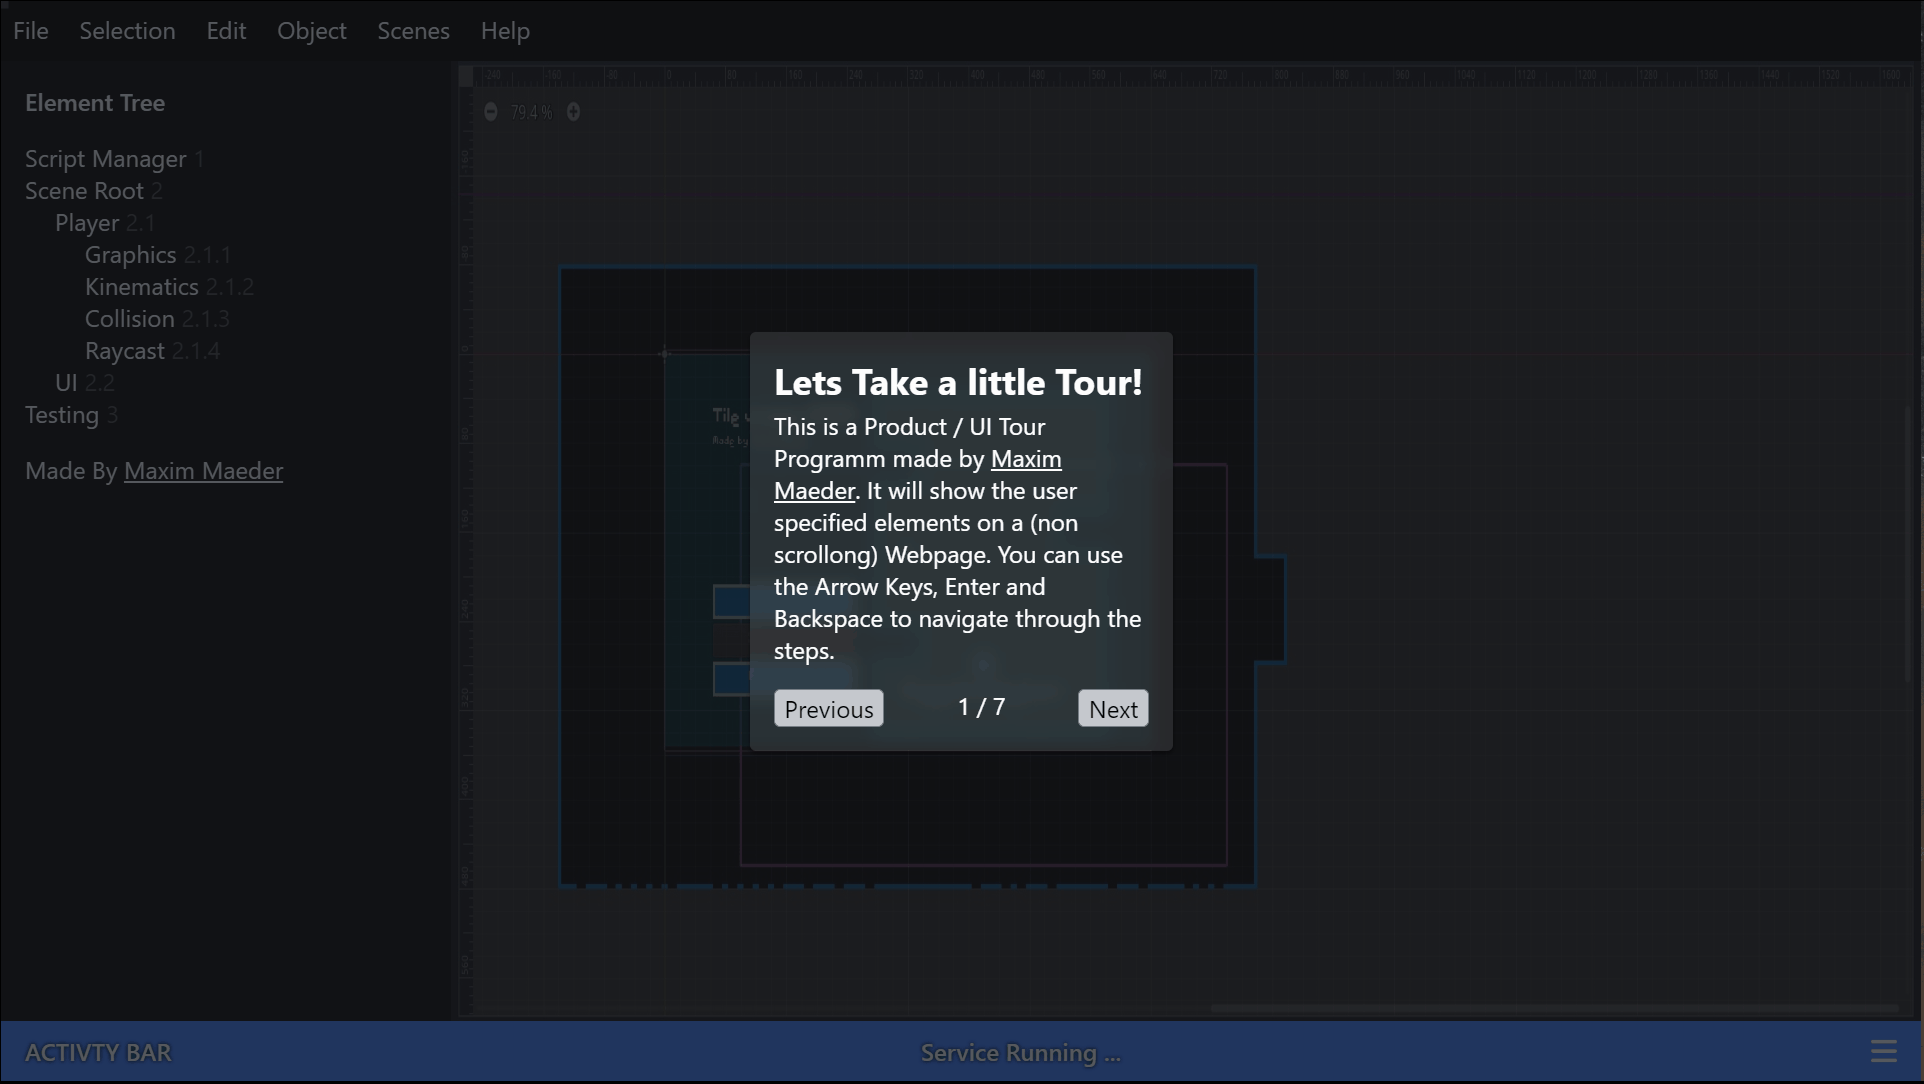
¶Showcase of the Product Tour
Below you will see a demo of the program in action.
¶Conclusion
Excellent! You have successfully created a UI Showcase / Tour using JavaScript code! See how you can add more features to this program, such as an Intro or a skip button.
Keep in mind that I am also just a beginner, so it could be that my way of solving these problems is not the best or that I use functions or features that aren’t advised to use. Always ask questions and try to solve problems your way!

Leave a Reply