
Markdown Inputs with HTML, CSS and JavaScript
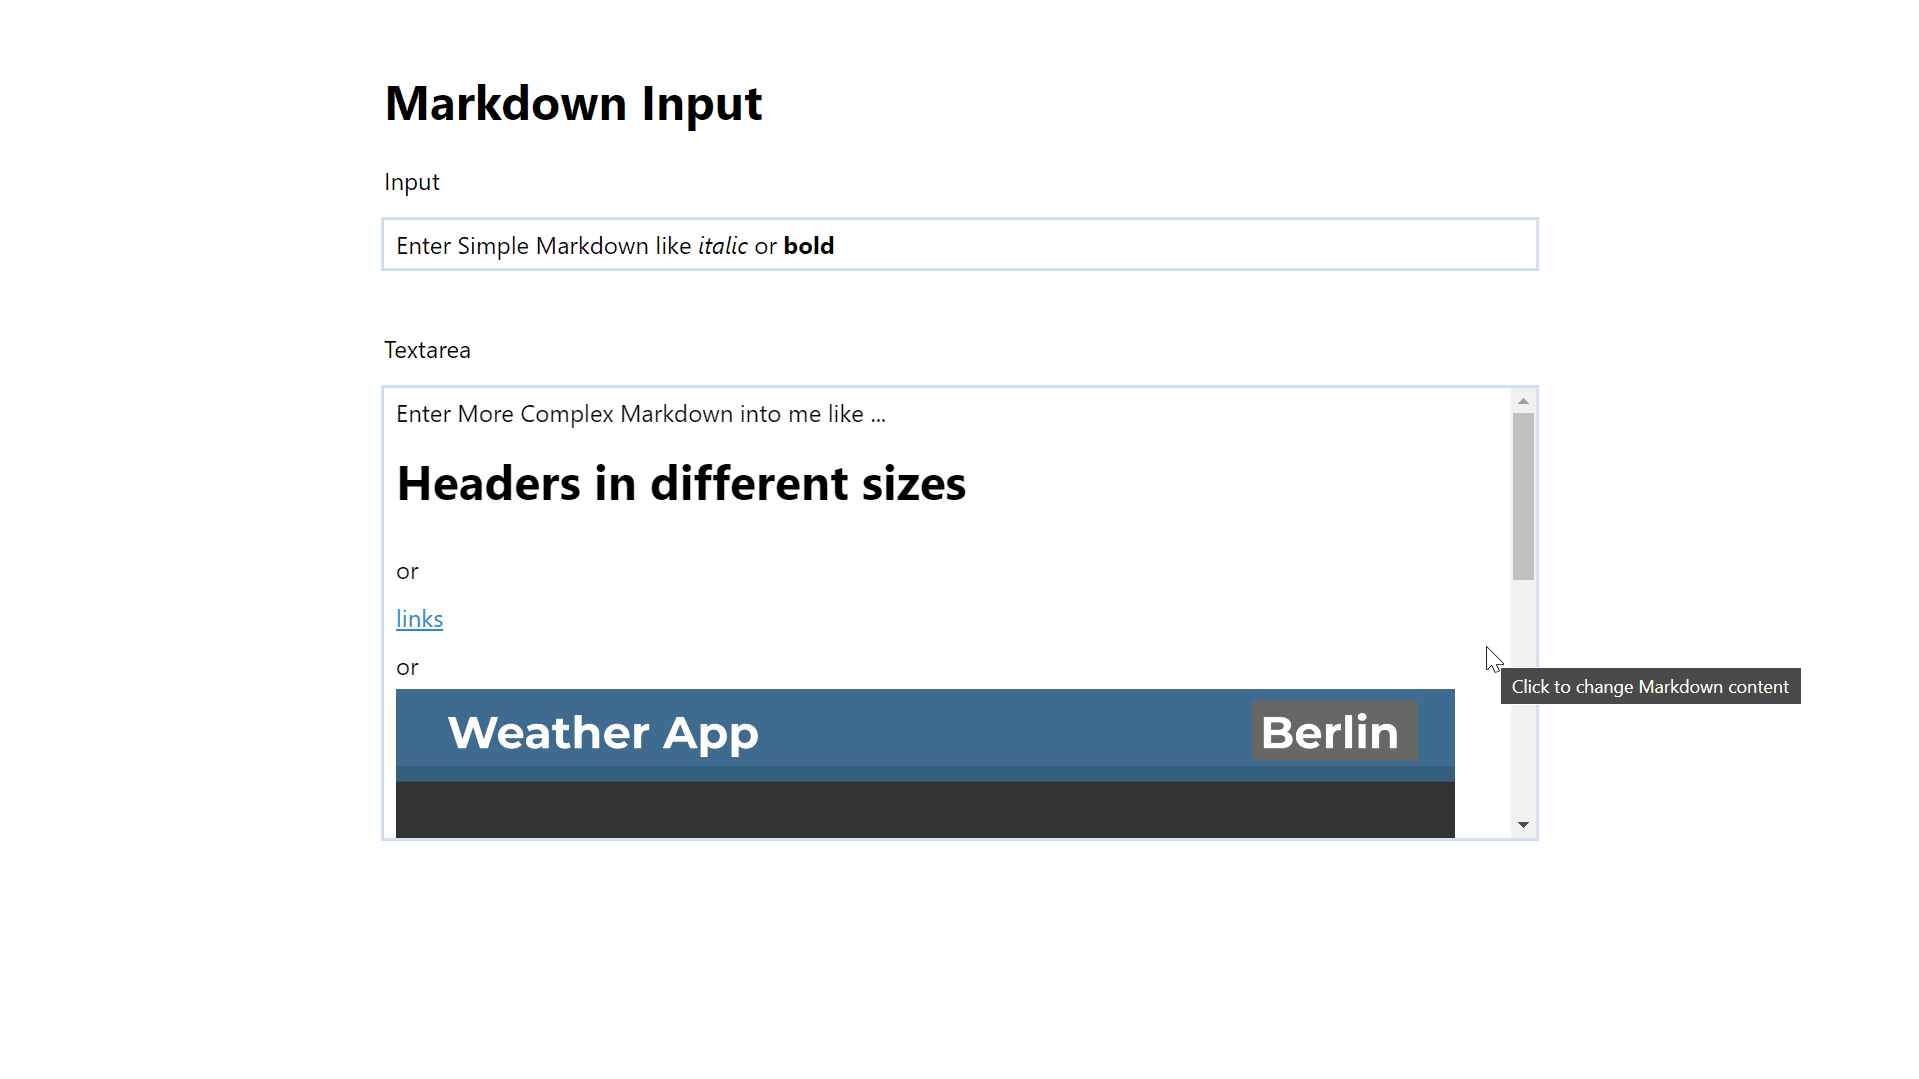
In this Tutorial, we will make input areas that allow simple markdown markup to show itself when the user is not currently focused on the input itself. Visit the demo to get a clearer Idea of what we are trying to accomplish here. Input areas like these are used in Trello and other software by Atlassian. One could say this approach is somewhere between only unformatted text and a full Rich Text Editor.
Let us get into it!
¶HTML Structure
Let’s first think about what the HTML for such an input or textarea element should look like. In this Tutorial, we will do it as you see in the Code below. We have a wrapper div with the class mdEdit, and inside, we have one div that will hold the formatted text and either an input element or a textarea. We will then make it, so only one of those two items is visible at any time.
Let’s keep this structure in mind for the JavaScript and CSS later in the Tutorial.
<div class="mdEdit">
  <div></div>
  <input type="text" value="Initial Value">
</div>
¶JavaScript
The script will handle formatting the text and toggling focus for the input elements. We make it so the page can have any number of these special inputs. That’s why we first loop over a list of all the .mdEdit wrapper elements. We have to first transform the HTMLElementCollection to an Array with Array.from().
Array.from(document.querySelectorAll('.mdEdit')).forEach((el) => {
	...
}
Inside the loop for each element, we first set a title that explains a little bit of the functionality to the user, and we also set tabindex to 0, so the user can focus on this element with the tab key.
el.setAttribute('title', 'Click to change Markdown content')
el.setAttribute('tabindex', '0')
Then we get the two elements inside the wrapper: The Edit Area and the Display Area. For the display, this is easy, but for the edit, we first check if the querySelector for an input element yields a result. If that’s the case, we get that; if not, we search for a textarea.
const display = el.querySelector('div');
const editEl = el.querySelector('input') ? el.querySelector('input') : el.querySelector('textarea');
Then we check if the tag is a textarea. We do this with the tagName Attribute of any element. This value is, for some reason, capitalized. Anyway, if that’s the case, we set the wrapper’s height to 300 Pixels.
if (editEl.tagName == 'TEXTAREA') {
    el.style.height = '300px';
}
Then we connect the change event of the edit element to a function called applyRegex that will handle formatting the text. We also call this function after that, so the text is formatted for the first time.
editEl.addEventListener('change', applyRegex)
applyRegex()
After that, we also add an event listener for the click event to the wrapper that will set focus onto the edit element.
el.addEventListener('click', () => {
    editEl.focus();
})
And now, the last event listener is for the whole document and the key down event. We make it so if the user presses enter while focused on the wrapper; we also focus on the editor. To do this, we use the activeElement property from the document that will, as its name suggests, return the currently active element. We also make it, so the focus is lost if the user presses escape. To achieve this, we use the blur() method.
document.addEventListener('keydown, (ev) => {
    if (ev.key == 'Enter' && document.activeElement == el) {
        editEl.focus()
    } else if (ev.key == 'Escape' && document.activeElement == editEl) {
        document.activeElement.blur()
    }
})
Let’s get to the applyRegex function. In this case, we parse the text ourselves, but maybe it’s better to use a pre-made parser like Showdown. Either way, we start by getting the value from the input element with the value attribute, and we save the text to a variable.
function applyRegex() {
	let parsed = editEl.value
}
Then we once again check if we are dealing with a textarea. If that is the case, we replace lines starting with # with h* tags. We do all six header tags in reverse order. Here we use the multiline modifier and the line start character ^. After that, we check for substrings like this  that we will replace with images, placeholders with $ come in handy here. We do the same thing with links only difference is that they don’t start with a !.
if (editEl.tagName == 'TEXTAREA') {
parsed = parsed.replace(/^###### (.*)/gm, '<h6>$1</h6>')
parsed = parsed.replace(/^##### (.*)/gm, '<h5>$1</h5>')
parsed = parsed.replace(/^#### (.*)/gm, '<h4>$1</h4>')
parsed = parsed.replace(/^### (.*)/gm, '<h3>$1</h3>')
parsed = parsed.replace(/^## (.*)/gm, '<h2>$1</h2>')
parsed = parsed.replace(/^# (.*)/gm, '<h1>$1</h1>')
parsed = parsed.replace(/)/g, '<img src="$2">')
parsed = parsed.replace(/[(.*?)]((.*?))/g, '<a href="$2" target="_blank">$1</a>')
}
Now for syntax that is replaced in textareas and input elements. These Patterns handle inline markdown markup like **bold**, *ìtalic*, strikethrough, and so on, so they all look similar. Remember that you can escape special characters in regex by putting a backslash in front of them.
parsed = parsed.replace(/**(.*?)**/g, '<b>$1</b>')
parsed = parsed.replace(/*(.*?)*/g, '<i>$1</i>')
parsed = parsed.replace(/_(.*?)_/g, '<sub>$1</sub>')
parsed = parsed.replace(/~(.*?)~/g, '<del>$1</del>')
parsed = parsed.replace(/^(.*?)^/g, '<sup>$1</sup>')
parsed = parsed.replace(/`(.*?)`/g, '<code>$1</code>')
Lastly, we insert the parsed string into the display element.
displayEl.innerHTML = parsed
¶CSS
Our program should work now, but it won’t look nice, so let’s also style it with CSS. We start by simply setting box-sizing to border-box so things are easier later, and we also put another font for the body.
* {
    box-sizing: border-box;
}

body {
    font-family: 'Segoe UI', sans-serif;
}
Then we set a height and a line height, among other things, for the wrapper element. And we change the outline if there is focus on or within the wrapper. We do this with :focus-within.
.mdEdit {
    height: 2em;
    background-color: RGB(255, 255, 255);
    outline: 2px ridge rgba(50, 104, 220, 0.2);
    transition: outline 0.5s ease;
    line-height: 2em;
}

.mdEdit:focus-within {
    /* box-shadow: 0 0 5px rgb(181, 181, 181); */
    outline: 2px ridge rgba(50, 104, 220, 1);
}
Then for the two elements inside the wrapper, we set the height to be 100%, we add a little bit of padding to the left and set overflow to auto so the display area won’t flow out of the wrapper weirdly.
.mdEdit>* {
    height: 100%;
    font-size: 1em;
    padding: 0;
    padding-left: 0.5em;
    width: 100%;
    overflow: auto;
}
We then add some styles to the elements inside the display element. `white-space: pre-wrap will make it so new lines also show in the HTML and aren’t omitted.
.mdEdit div * {
    margin-bottom: 0.1em;
    line-height: 0.5em;
}

.mdEdit div a{
    color: rgba(50, 104, 220, 1);
}

.mdEdit div code {
    color: rgba(50, 104, 220, 1);
    background-color: rgb(240, 240, 240);
    padding: 0.4em;
}
.mdEdit div img {
    max-width: 95%;
}

.mdEdit div {
    white-space: pre-wrap;
}
Now we also need to make it so the input element won’t show by default only when there is focus on the wrapper or itself.
.mdEdit:focus-within>div {
    display: none;
}

.mdEdit:focus-within :is(input, textarea) {
    display: initial;
}

.mdEdit input,
.mdEdit textarea {
    display: none;
    font: inherit;
    border: none;
    overflow-x: auto;
    resize: none;
}
.mdEdit textarea {
    font-family: consolas;
}

.mdEdit input:focus,
.mdEdit textarea:focus {
    border: none;
    outline: none;
}
¶Showcase
¶Conclusion
Excellent! You have successfully created Markdown Inputs!
Keep in mind that I am also just a beginner, so it could be that my way of solving these problems is not the best or that I use functions or features that aren’t advised to use. Always ask questions and try to solve problems your way!

Leave a Reply