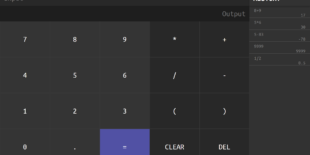
Calculator with History Function in HTML, CSS, and JavaScript
In this Tutorial, we will make a simple Calculator with a history function utilizing JavaScript, HTML, and CSS. We will use the eval function to evaluate the expression, but keep in mind that this is somewhat dangerous and it should be used with great care in Production Environments. We will also make use of the Window.localStorage API to store a list of expressions that were previously typed into the calculator.
¶HTML
Let’s start with the Markup of the Calculator as it defines the Buttons and possible tokens.
We start by wrapping everything in a div with the container class then we have to divs as children that act as two columns. the left side will be the calculator itself and the right side will show the History. For the input and output, we use the input element and we disable it for the output. We do it this way so the elements always have the same height regardless of the current content.
After that, we have the buttons of the Calculator that are once again located inside a container that will align them in a grid. Later we will connect the buttons and mostly insert their content into the input and evaluate that.
We then also add a right-side container that will hold the history.
<div class="container">
  <div class="leftSide">
    <input type="text" id="input" placeholder="Input">
    <input type="text" id="output" placeholder="Output" disabled="true">

    <div class="buttons">
      <button class="greyButton">7</button>
      <button class="greyButton">8</button>
      <button class="greyButton">9</button>
      <button>*</button>
      <button>+</button>

      <button class="greyButton">4</button>
      <button class="greyButton">5</button>
      <button class="greyButton">6</button>
      <button>/</button>
      <button>-</button>

      <button class="greyButton">1</button>
      <button class="greyButton">2</button>
      <button class="greyButton" class="greyButton">3</button>
      <button>(</button>
      <button>)</button>

      <button class="greyButton">0</button>
      <button class="greyButton">.</button>
      <button class="blueButton">=</button>
      <button>CLEAR</button>
      <button>DEL</button>
    </div>
  </div>
  <div class="rightSide">
    <h4>HISTORY</h4>
    <div class="historyContainer">

    </div>
  </div>
</div>
¶JavaScript
Let’s now get to the JavaScript of the Calculator. Bear in mind that this code will be a wee bit convoluted since we make a calculator while also implementing a history function for it.
We start by saving some important elements to variables so we can use them later and so we don’t have to query them a bunch of times.
const buttons = document.querySelectorAll('.buttons button')
const inputEl = document.querySelector('input')
const output = document.querySelector('#output')
const historyContainer = document.querySelector('.historyContainer')
Then we set a name for the storage of the history. We then also check if there is something at this name inside local storage by using the getItem() method. In case this value is null we set this index to an empty array. The local storage is basically an object which survives the page and the browser reloads but it does not support other objects so we have to turn them to json strings with JSON.stringify(). Lastly, we call the refreshHistory() Function that will redraw the items in the history column, we will later look at what it does exactly.
const STORAGE_NAME = 'history_v4';

if (localStorage.getItem(STORAGE_NAME) == null) {
    localStorage.setItem(STORAGE_NAME, JSON.stringify([]))
}

refreshHistory()
We continue by looper over all the button elements. Inside the loop, we save the innerHTML of the Elements to a variable and we add an event listener to it for the pointerdown event which triggers if someone clicks or taps the element.
for (let button of buttons) {
    const symbol = button.innerHTML

    button.addEventListener('pointerdown', () => {
        ...
    })
}
Inside the event listener Callback, we check the elements for special meaning. For = we want to save the current expression and push the output content into the input element, so we get the History List by using localStorage.getItem(key) and JSON.parse(str). We then check if the element is already in the history and if it’s not, we insert it. After that, we also need to set the value in the local Storage with localStorage.setItem(key, value).
Now if the pressed button had the value DEL we delete one character from the end and if it was CLEAR we clear the input of any content. In any other case, we simply add the character to the input. Lastly, we call a function that will registrate the changes made to the input element.
// Inside event callback

if (symbol == '=') {

    const historyElements = JSON.parse(localStorage.getItem(STORAGE_NAME))
    if (!historyElements.includes(inputEl.value)) {
        historyElements.push(inputEl.value)
    }
    localStorage.setItem(STORAGE_NAME, JSON.stringify(historyElements))


    inputEl.value = output.value
    refreshHistory()
}
else if (symbol == 'DEL') {
    inputEl.value = inputEl.value.slice(0, inputEl.value.length - 1)
} else if (symbol == 'CLEAR') {
    inputEl.value = ''
} else {
    inputEl.value += symbol;
}

registrateChange()
¶Registrate Changes
Then we bind the input event of input elements to the registrateChange function and we define it. We simply evaluate the value in the input and we insert the result into the output.
inputEl.addEventListener('input', registrateChange)

function registrateChange() {
    let newValue = eval(inputEl.value) || ''

    output.value = newValue
}
¶Refresh History Function
Let’s also go over the refreshHistory function, which will redraw the content of the history column. So we first empty the container and then we get the history list from local storage and then we loop over each item and we add a div to the container for each expression.
function refreshHistory() {
    historyContainer.innerHTML = ''

    let historyElements = JSON.parse(localStorage.getItem(STORAGE_NAME))

    for (let i = historyElements.length - 1; i >= 0; i--) {

        const div = document.createElement('div')
        div.className = 'historyItem'

        let evaluated = ''

        try {
            evaluated = eval(historyElements[i])

        } catch (error) {
            evaluated = 'INVALID RESULT'
        }

        div.innerHTML = `
            <div>${truncate(historyElements[i], 14)}</div>
            <div>${truncate(evaluated, 14)}</div>
        `

        historyContainer.appendChild(div)

        div.addEventListener('pointerdown', () => {
            inputEl.value = historyElements[i];
            registrateChange()
        })
    }
}
¶CSS
Below you see the CSS code of the Program, I will not go further into detail.
@import url('https://fonts.googleapis.com/css2?family=Ubuntu+Mono&display=swap');

#input,
#output {
    padding: 0.5em;
}

#output {
    text-align: right;
    background-color: rgb(30, 30, 30);
}

* {
    box-sizing: border-box;
}

h6 {
    margin: 0
}

body {
    font-family: 'Ubuntu Mono', monospace;
    font-size: 200%;
    height: 100vh;
    margin: 0;
    background-color: rgb(50, 50, 50);
    color: white;
    display: flex;
    justify-content: center;
    align-items: center;
    overflow: none;
}

.container {
    overflow: none;
    width: 100vw;
    height: 100vh;
    background-color: rgb(40, 40, 40);
    box-shadow: 0 0 4px rgb(0, 0, 0);
    display: grid;
    grid-template-columns: 1fr 250px;
}

.leftSide {
    display: flex;
    flex-direction: column;
}

.rightSide {
    background-color: rgb(50, 50, 50);
    display: flex;
    flex-direction: column;
    height: 100vh;
}

.rightSide h4 {
    padding: 0.5em;
    box-shadow: 0 5px 5px rgba(0, 0, 0, 0.2);
}

h1, h2, h3, h4, h5, h6 {
    margin: 0;
}

@media screen and (max-width: 700px) {
    .rightSide {
        display: none;
    }
    .container {
        grid-template-columns: 1fr;
    }
}

.historyContainer {
    flex-grow: 1;
    overflow-y: auto;
    overflow-x: hidden;
}

button,
input {
    font: inherit;
    color: inherit;
    background-color: inherit;
    border: none;
}

.buttons {
    display: grid;
    grid-template-columns: 1fr 1fr 1fr 1fr 1fr;
    flex-grow: 1;

}

.buttons button {
    border: 1px solid rgb(60, 60, 60);
}

.blueButton {
    background-color: rgb(81, 81, 164)
}

.greyButton {
    background-color: rgba(100, 100, 100, 0.2)
}

.historyItem {
    border-bottom: 1px solid rgb(100, 100, 100);
    padding-left: 1em;
    padding-right: 1em;
    color: grey;
    font-size: 60%;
}

.historyItem>*:first-child {
    padding-top: 0.5em;
}

.historyItem>*:last-child {
    text-align: right;
}

::-webkit-scrollbar {
    background-color: transparent;
}

::-webkit-scrollbar-thumb {
    background-color: rgba(100, 100, 100, 0.2);
    transition: background-color 0.3s ease;
}
¶Conclusion
Excellent! You have successfully created a Calculator using HTML, CSS, and JavaScript code!
Keep in mind that I am also just a beginner, so it could be that my way of solving these problems is not the best or that I use functions or features that aren’t advised to use. Always ask questions and try to solve problems your way!

calculator online free
I know this if off topic but I'm looking into starting my own weblog and was wondering what all is needed to get setup? I'm assuming having a blog like yours would cost a pretty penny? I'm not very internet smart so I'm not 100% positive. Any tips or advice would be greatly appreciated. Thank you
Maxim
Hey whats up friendo No worries Im glad to help out! So the most expensive thing for me is the hosting which costs about 250 Dollars / Year and the domain itself also costs 10 Dollars / Year. This Blog is made with Wordpress which is free and most of the Plugins within Wordpress are also free or have free versions so no worries there. I hope that I could help out! Kind Regards, Maxim Maeder